Lip Blushing Procedure Healing Process Time Pain Aftercare
Lip blushing has emerged as a popular cosmetic tattooing technique designed to enhance the natural color and shape of your lips. It offers a subtle tint and can provide a fuller appearance without the need for fillers. For those interested in this treatment, understanding the process, preparation, healing stages, pain levels, and aftercare is essential. Through this comprehensive article we aim to cover everything you need to know about lip blushing, including how to prepare for your session, what to expect during and after the procedure, and how to maintain and fix your results.
What Is Lip Blushing?
Lip blushing is a semi-permanent cosmetic tattooing procedure that enhances the natural color and shape of the lips. Using tiny mechanized needles, a professional deposits colored pigment into the lips to create a soft, natural-looking tint. The result is a subtle wash of color that enhances the lips’ appearance, making them look fuller and more defined without the need for makeup.
How to Prepare for a Lip Blush Session
Preparing for your lip blush sessions is crucial to achieving the best results. Here’s a detailed guide on how to prepare for each session, from the initial consultation to follow-up appointments.
Session 1: Initial Consultation and First Lip Blush Session
1. Initial Consultation:
- Research and Choose a Qualified Technician: Look for a certified and experienced lip blush artist with a strong portfolio.
- Discuss Your Expectations: Talk about your desired lip color, shape, and overall look. Bring reference photos if you have specific ideas.
- Health and Medication Disclosure: Inform your technician about any health conditions, allergies, or medications you are taking to ensure the procedure is safe for you.
- Patch Test: Some technicians may conduct a patch test to check for any allergic reactions to the pigment.
2. Preparing for the First Session:
- Hydrate Your Lips: Start moisturizing your lips a week before the procedure to ensure they are well-hydrated. Avoid any products that could cause dryness.
- Avoid Blood Thinners: Refrain from taking aspirin, ibuprofen, or any blood-thinning medications at least 48 hours before your appointment. This includes alcohol and caffeine.
- No Lip Procedures: Avoid any lip fillers or other lip treatments for at least two weeks before your session.
- Healthy Lifestyle: Stay hydrated, eat a nutritious diet, and get plenty of rest to ensure your body is in optimal condition for healing.
3. The First Session:
- Arrive Early: Arrive at the studio a little early to complete any necessary preparatory work and relax before the procedure.
- Topical Numbing: Your lip blushing artist will apply a numbing cream to your lips to minimize discomfort during the procedure.
- Design and Pigment Selection: Finalize the design and pigment color with your lip blushing artist.
- Tattooing Process: The artist will use a handheld device to deposit pigment into your lips. This process typically takes 1-2 hours.
- Aftercare Instructions: After the procedure, you’ll receive detailed aftercare instructions to ensure proper healing.
Session 2: Follow-Up and Touch-Up Session
1. Assessing the Initial Results:
- Healing Check: Your lip blushing artist will evaluate how well your lips have healed and how the pigment has settled.
- Discuss Adjustments: Discuss any concerns or desired adjustments based on the initial results.
2. Preparing for the Touch-Up Session:
- Repeat Hydration and Avoidance: Just like before the first session, keep your lips hydrated and avoid blood thinners.
- Observe Healing: Note any areas that need additional pigment or correction and inform your technician.
3. The Touch-Up Session:
- Numbing Cream: A numbing cream will be applied again to ensure your comfort.
- Additional Pigment: The lip blushing artist will add more pigment where necessary to enhance the color and shape.
- Aftercare Instructions: Follow the aftercare instructions provided, similar to the first session.
Session 3 and Beyond: Additional Touch-Up Sessions (If Necessary)
1. Ongoing Assessment:
- Evaluate Results: Each subsequent session allows for further refinement and enhancement of the lip blush.
- Address Concerns: Continue to communicate any concerns or desired changes with your technician.
2. Preparing for Additional Sessions:
- Consistent Care: Maintain the same preparation steps: hydration, avoiding blood thinners, and observing healing.
3. The Procedure:
- Refinement: These sessions are usually shorter as they focus on fine-tuning the color and shape.
- Comfort Measures: Numbing cream will still be used to ensure comfort during the procedure.
What Is the Lip Blush Procedure?
The lip blush procedure involves several steps:
- Consultation: Before the actual procedure, you will have a consultation with your lip blushing artist to discuss your desired outcome, choose the right pigment color, and address any concerns.
- Numbing: A topical numbing cream is applied to your lips to minimize discomfort during the procedure.
- Design: Your artist will outline your lips to create a guide for the tattooing process.
- Tattooing: Using a handheld device with a fine needle, the technician deposits the pigment into the lips. This process can take 1-2 hours, depending on the desired intensity and coverage.
- Final Touches: After the initial application, your lip blushing artist will assess the results and make any necessary adjustments to ensure even color distribution.
Lip Blushing Pain Level: Does It Hurt?
The pain level experienced during lip blushing varies from person to person. Most clients report feeling mild discomfort rather than significant pain. The numbing cream applied before the procedure helps to alleviate most of the discomfort. The sensation is often described as light scratching or pinching. If you have a low pain threshold, inform your lip blushing specialist, who can provide additional numbing solutions if necessary.
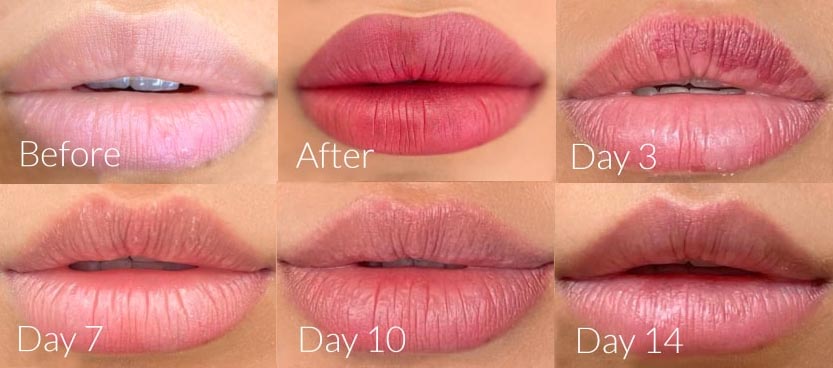
Results & Lip Blush Healing Process Time: Day by Day Stages
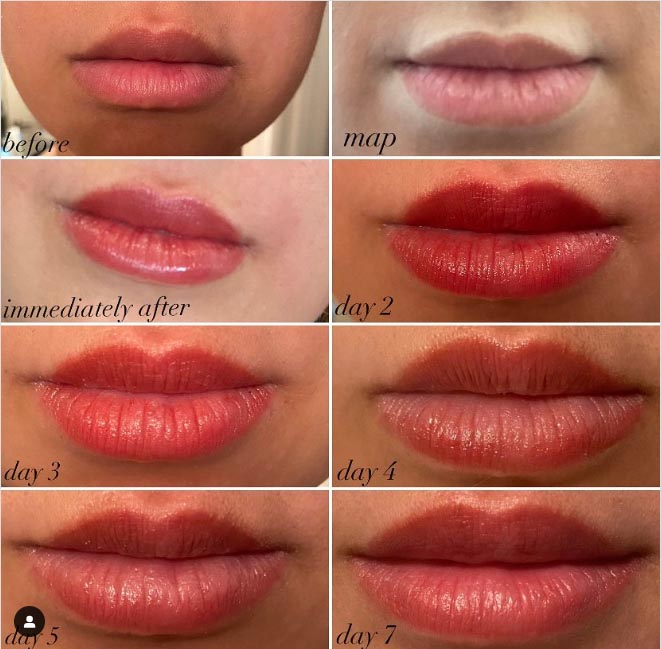
The healing process for lip blushing typically spans several weeks, with noticeable stages:
Day 1-2: Your lips will appear bold and vibrant immediately after the procedure. Swelling and redness are common during this stage.
Day 3-4: The initial swelling starts to subside, and the color begins to darken as the lips start to scab.
Day 5-7: Scabbing becomes more prominent. It is crucial not to pick at the scabs, as this can affect the final outcome.
Day 8-10: The scabs start to flake off, and the color may appear uneven or patchy. This is normal and part of the healing process.
Day 11-14: The lips continue to heal, and the color may lighten significantly, a phase known as lip blushing color ghosting.
Weeks 3-4: The true color of the lip blush begins to emerge as the lips fully heal. The final result is typically softer and more natural-looking.
Lip Blushing Aftercare: Post-Treatment Care
Proper aftercare is crucial to achieve the best results from your lip blushing procedure. Follow these steps to ensure a smooth healing process:
- Keep Lips Clean: Gently clean your lips with a damp cotton pad to remove any lymph fluid and prevent scabbing.
- Moisturize: Apply a recommended ointment or balm to keep your lips hydrated and promote healing.
- Avoid Picking: Do not pick or scratch your lips, as this can lead to uneven pigment retention and scarring.
- Stay Hydrated: Drink plenty of water to keep your body and lips hydrated.
- Avoid Certain Activities: Refrain from swimming, intense exercise, and sun exposure for at least a week after the procedure.
- Use a Straw: Drink liquids through a straw to avoid unnecessary contact with your lips during the initial healing phase.
- Follow Technician’s Advice: Adhere to any additional aftercare instructions provided by your technician.
How to Fix Old Lip Blushing
Over time, the pigment from lip blushing can fade or become uneven. If you need to fix or refresh your old lip blush, consider the following options:
- Touch-Up Session: Schedule a touch-up session with your original technician to enhance and correct any faded areas.
- Color Correction: If the original pigment has changed color, a skilled technician can perform a color correction procedure to neutralize unwanted hues and restore a natural look.
- Laser Removal: In cases where you are unhappy with the overall result, laser removal can help lighten or remove the pigment, allowing for a fresh start.
Lip blushing is a transformative procedure that enhances the natural beauty of your lips. By understanding the process, preparing adequately, and following proper aftercare, you can achieve stunning results.
If you are planning to get lip blushing done, then book a free consultation with us at +91-9876543285 or e-mail us at info@tattoosnewdelhi.com to ensure the best possible results and enjoy the confidence that comes with beautifully blushed lips.